

Momentum is a plugin that provides MVC pattern for flutter.
Intro
Before we go in deep with the intro, im sure there are many state management plugins in flutter and this is no different, its certainly wasn't made yesterday but it's been around for a while now. Im going to share my experience with it and i hope you will consider it and give it a try
What is Momentum
From the official docs, momentum is a MVC pattern for flutter and it sure does lives up to its promise. It comes equipped with great features out of the box and is made purely in Flutter with no other third party dependencies and is actively maintained.
Features
- State Management
- Dependency Injection
- Service Locator
- Persistance State
- Routing
- Event System
- Testing
This is going to be a series, to try to walk through some of the features listed above but not all of them. We will be building a Food App and the end goal will be like this

Installation
Add the momentum plugin to your pubspec.yaml file
dependencies:
    momentum:
MVC (Model View Controller)
What is [MVC](guru99.com/mvc-tutorial.html#:~:text=The%20..
The Model-View-Controller (MVC) framework is an architectural pattern that separates an application into three main logical components Model, View, and Controller.
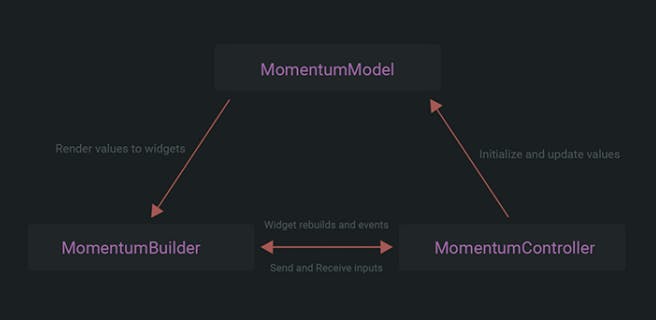
Here is a diagram describing the flow between state (model), widget (view) and the logic (controller).
Both MomentumController and MomentumModel are abstract classes that needs to be implemented. A pair of model and controller is called a component. MomentumBuilder is simply a widget. This is used to listen to controllers for rebuilds and accessing models to display their values.
This is all the logic behind Momentum plugin and thats all you will be doing in your flutter project.
State Management
How do you manage state with Momentum?
Quite easy, just call model.update(..). But what is model.update(..)? If you have guessed, thats the M for Model. The model and controller pair are called the components and will use this term throughout the series to refer to this couple.
The components have very short boilerplate codes. The controller is the logic and the Model is the state. A component is not tied to a single widget only, you can use a component in multiple pages/widgets across the app.
Example Model
import 'package:momentum/momentum.dart';

import 'index.dart';

class UserModel extends MomentumModel<UserController> {
    UserModel(UserController controller, {
        this.email,
        this.name,
        this.contact,
    }) : super(controller);
    // TODO: add your final properties here...
    final String name;
    final String email;
    final String contact;

    @override
    void update({
        String email,
        String name,
        String contact,
    }) {
        UserModel(
            controller,
            name: name ?? this.name,
            email: email ?? this.email,
            contact: contact ?? this.contact,
        ).updateMomentum();
    }
}
This is an example model coupled together with its Controller, it sure looks like a long boilerplate code but the advantage is the reusability that you will notice later in this series. So whats happening here? We defined our final propeties, which is the state that we will want to manipulate in Controller and also access in the View of this component. This is all about your Model, you define your properties here and you are done, thats all the Model does, you now have your model properly set. Remember the model.update(...) i mentioned, thats the update(...) override method there, it is required to be implemented and is similar to copyWith function. If i need to change the name property in the controller or view i simply call model.update(name: 'Donny', contact: '0778xxxxxx') and the View will update automatically
There is only one way to update or rebuild widgets. That is using model.update(...) .
model.update(...) is like setState(...) but immutable and called inside logic class not inside the widgets. It's not just for rebuilding widgets but also syncing values when something changes in the UI like user inputs.
Check out the momentum vscode extension that makes it easy to create Momentum component
Example Controller
import 'package:momentum/momentum.dart';

import 'index.dart';

class UserController extends MomentumController<UserModel> {
    @override
    UserModel init() {
        return UserModel(
            this,
            name: '',
            email: '', // specifying initial values
            contact: '',
        );
    }

    void addUser(User user) {
        // update state (rebuild widgets)
        model.update(name: user.name, email: user.email);
    }
}
The init() method is the initial state that is called when the app starts.
The logic of the app resides in this controller, you write all functions here and its where you call that model.update(..). Properties defined in the Model can be accessed using model.propertyName for example, to grab the name, model.name.
Models are immutable so you can't do
model.name = 'Flutter';to update the state.
You can do anything inside controllers like calling and awaiting an Api request while showing a loader on the UI etc.
Example View (Widget)
To be able to have the UI for the components to complete our trio, i will show a simple view example. This is where MomentumBuilder comes into play. Imagine in your stateless widget build method.
class UserView extends StatelessWidget {
    @override
    build(BuildContext context) {
        return Scaffold(
            appBar: AppBar(title: Text('Momentum Demo'),),
            body: Center(
                child: MomentumBuilder(
                    // inject controller, can add as many as you want to access
                    controllers: [UserController],
                    builder: (context, snapshot) {
                        // grab the model, its already coupled together
                        final userModel = snapshot<UserModel>();

                        return Column(
                            children: [
                                // can now access the model | state in this View
                                Text(userModel.name),
                                Text(userModel.email),
                            ],
                        );
                    }
                ),

            ),
            floatingActionButton: FloatingActionButton(
                onPressed: Momentum.controller<UserController>(context).addUser(user),
                child: Icon(Icons.person_add),
            )
        );
    }
}
This is pretty straight forward, the widget that depends on the state is wrapped with the MomentumBuilder and it will react to it whenever model.update() is called. The good thing about this approach is that you can include as many controllers as you want that you want this View to access, you will see a real world example as we do the Food App so stay tuned. Note that controllers are passed as instance not like this UserController() but UserController.
Dependency Injection & service locator
Yes momentum has this out of the box and its straight forward. With momentum you can easily access almost everything, yes!. It has 3 approaches to DI.
- Access a controller inside another controller
This is straight forward and you call controller<T>() method to access the other controller. Once you grab that, you can call any method or even the model of that controller
class AuthController extends MomentumController<AuthModel> {
    // ... (skipped for simplicity)

    Future<void> loginUser() async {
        // grab sessionController - DI here
        final _sessionController = controller<SessionController>();
        // you can now do anything with this controller
        // call controller methods
        // bool isActive = await _sessionController.isSessionActive();
        // grab controller model property
        // var sessionName = _sessionController.model.name;
    }
}
- Access a controller inside the View (Widget)
Pretty straight forward again, simply call Momentum.controller<T>(context). Remember the Example View section in the FloatingActionButton? we used DI to access the controller.
- Access inside
MomentumBuilder
I think you have noticed, in the View example we only passed the Controller and we just grabbed the Model with snapshot<UserModel>(); but how do i have access to that model's controller? Quite easy too, we would have done it like this var userController = userModel.controller; and thats it :)
Ok enough with controllers, how about Services?
Sometimes in my projects i like to structure services on their own for scalability, reusability and just good clean code. All my api requests i put them in one service class say ApiService and maybe all dialog services i also add them to my DialogService class for example.
To define a service class that Momentum will be able to pick, extend the MomentumService abstract class
class ApiService extends MomentumService {
    Future<bool> isUserLoggedIn() async {
        var result = await makeReq();
        return result;
    }

    Future register(User user) async {
        await http.post('url', data: user.toMap());
    }
}
Nothing fancy here, just a class that house all your api request, that extends momentum class.
Service locator
So how do we grab those services? Lets see the power of extending our services with MomentumService
- Access a service inside a controller
Just use the service<T>(). Isn't that cool, the name on its own is straight forward, thats the good thing about Momentum, the name speaks for itself
class AuthController extends MomentumController<AuthModel> {
    // ... (skipped for simplicity)

    Future<void> loginUser() async {
        // grab the service
        final _authService = service<ApiService>();
        // you can now call any method of the service
        var isLogged = await _authService.isUserLoggedIn();
    }
}
- Access service inside the View (Widget)
Just like controllers, you call Momentum.service<T>() where ever you want to locate your service
Event System
Let me wrap up with Momentum Event system. I found this really handy, so what are they?
This is handy for showing dialogs, snackbars, notifications etc. So imagine in our controllers, we call our isLoggedIn() from our service, then what after we have got the result? This will be a great point where we will show the user in the View about it, so we will probably show a toast or snackbar or anything, just for example. So when we are done processing in the controller, whether the process was successful or error happened, we will fire up an event to the View so that it renders an appropriate message or dialog.
Momentum Event uses Stream under the hood
Lets demo this with an example, the boilerplate code is quite long but it sure does the trick. I advice that you create an event class you will use to listen to in the View. As an example lets create an event class to be fired when we perform authentication like signup, login to the UI
// enum of event action to easily determine event action fired and received
enum AuthEventAction {
  None,
  Success,
  Fail,
  Error,
}

// event class
class AuthEvent {
  final AuthEventAction action;
  final String title;               // show appropriate title
  final String message;             // for a detailed message of the event fired

  AuthEvent({this.action, this.title, this.message});
}
This is straight forward, in the View we simply switch..case the AuthEventAction that will give us an idea about which event has been fired and we can take appropriate action. Now lets see how we fire these event from Controllers
class AuthController extends MomentumController<AuthModel> {
    // ... (skipped for simplicity)

    Future<void> loginUser(email, pwd) async {
        // grab the api service for login req to backend
        final _authService = service<ApiService>();

        // update UI | View to show loader
        model.update(loading: true);

        var result = await _authService.login(email, pwd);

        // assume it returns true on successful login
        if(result) {
            // fire event here that we are successful
            sendEvent(
              AuthEvent(
                action: AuthEventAction.Success,
                title: 'login success',
                message: 'You have been logged in successfully',
            ),
          );
        }

        else {
            sendEvent(
              AuthEvent(
                action: AuthEventAction.Fail,
                title: 'login failure',
                message: 'Failed to login. Please try again later',
            ),
          );
        }


        model.update(loading: false);
    }
}
As you can see, all logic resides in the Controller, this keeps the code organized and clean, any changes i would want to add i simply jump here and start implementing it. sendEvent(..) is a momentum method that sends event and any listener will respond to it.
Lets see how you can listen to these events and take appropriate action. This is where you add your stateful widget. A stateful widget is needed inorder to listen for the event, no stream controllers here its automatically handled by the plugin, its done once in initMomentumState() its just like initState(..)
// (..) omitted for simplicity

@override
  void initMomentumState() {
   var _controller =  Momentum.controller<AuthController>(context);

    // listen for auth events
    _controller.listen<AuthEvent>(
      state: this,
      invoke: (event) {
        switch (event.action) {
          case AuthEventAction.Success:
          // show dialog
            showAuthDialog(
                title: event.title,
                message: event.message,
            )
            // can navigate to another page
            // Momentum router management
            MomentumRouter.goto(context, HomePage);
            break;

          case AuthEventAction.Fail:
            showAuthDialog(
                title: event.title,
                message: event.message,
            )
            break;

          default:
        }
      },
    );

    super.initMomentumState();
  }
Thats it with events, you listen to AuthEvent in the initMomentumState and whenever you fire an event from your controllers, this will be invoked and appropriate action is taken. This approach i found easy, many boilerplate code but code is organized and clean, and each part of the app knows where it belongs.
There is a lot about this plugin that i didnt cover in this intro, because its already long, i will cover as i go on with the series and a lot that i will keep exploring. More about momentum can be found here
Thank you for reading, if there is anything you want to know more or your thoughts about this article, please let me know in the comment section below. Until then, happy Fluttering 💙